本文共 6993 字,大约阅读时间需要 23 分钟。
一、注解 (Annotation) 概述
-
从 JDK 5.0 开始, Java 增加了对元数据(MetaData) 的支持, 也就是
Annotation(注解)。 -
Annotation其实就是代码里的特殊标记, 这些标记可以在编译, 类加载, 运行时被读取, 并执行相应的处理。通过使用Annotation, 程序员可以在不改变原有逻辑的情况下, 在源文件中嵌入一些补充信息。代码分析工具、开发工具和部署工具可以通过这些补充信息进行验证或者进行部署。 -
Annotation可以像修饰符一样被使用, 可用于修饰包、类、构造器、方法、成员变量、 参数、局部变量的声明, 这些信息被保存在Annotation的 “name=value” 对中。 -
框架 = 注解 + 反射机制 + 设计模式
二、注解的使用示例
示例一:生成文档相关的注解
@author 标明开发该类模块的作者,多个作者之间使用,分割@version 标明该类模块的版本@see 参考转向,也就是相关主题@since 从哪个版本开始增加的@param 对方法中某参数的说明,如果没有参数就不能写@return 对方法返回值的说明,如果方法的返回值类型是void就不能写@exception 对方法可能抛出的异常进行说明 ,如果方法没有用throws显式抛出的异常就不能写
示例二:在编译时进行格式检查(JDK内置的三个基本注解)
@Override: 限定重写父类方法, 该注解只能用于方法@Deprecated: 用于表示所修饰的元素(类, 方法等)已过时。通常是因为所修饰的结构危险或存在更好的选择@SuppressWarnings: 抑制编译器警告
//@Override: 限定重写父类方法, 该注解只能用于方法class Person{ private String name; private int age; public Person() { } public Person(String name, int age) { this.name = name; this.age = age; } public void walk(){ System.out.println("人走路"); } public void eat(){ System.out.println("人吃饭"); }}class Student extends Person{ public Student(String name, int age) { super(name, age); } @Override public void walk() { System.out.println("学生走路"); }} //@Deprecated: 用于表示所修饰的元素(类, 方法等)已过时。通常是因为所修饰的结构危险或存在更好的选择 @Deprecated public Date(int year, int month, int date) { this(year, month, date, 0, 0, 0); } //@SuppressWarnings: 抑制编译器警告 @SuppressWarnings("unused") int num = 10; 示例三:跟踪代码依赖性,实现替代配置文件功能
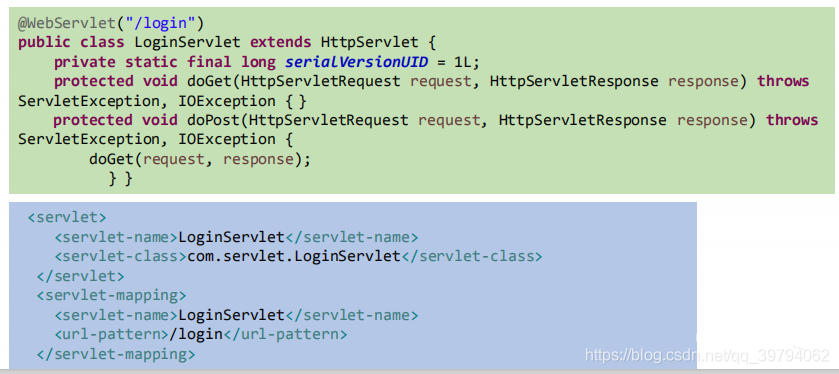
- Servlet3.0提供了注解(annotation),使得不再需要在web.xml文件中进行Servlet的部署。

- spring框架中关于“事务”的管理

三、自定义注解
- 定义新的
Annotation类型使用@interface关键字。 - 自定义注解自动继承了
java.lang.annotation.Annotation接口。 Annotation的成员变量在Annotation定义中以无参数方法的形式来声明。其方法名和返回值定义了该成员的名字和类型。我们称为配置参数。类型只能是八种基本数据类型、String类型、Class类型、enum类型。Annotation类型以上所有类型的数组。- 可以在定义
Annotation的成员变量时为其指定初始值, 指定成员变量的初始值可使用default关键字。 - 没有成员定义的
Annotation称为标记; 包含成员变量的Annotation称为元数据Annotation。 - 如果注解有成员,在使用注解时,需要指明成员的值。
public @interface MyAnnotation { String value() default "hello";} 四、JDK中的元注解
元注解指的是对现有的注解进行解释说明的注解。
@Retention
用于指定该 Annotation 的生命周期, @Rentention 包含一个 RetentionPolicy 类型的成员变量, 使用@Rentention时必须为该 value 成员变量指定值:
RetentionPolicy.SOURCE在源文件中有效(即源文件保留),编译器直接丢弃这种策略的注释。RetentionPolicy.CLASS在class文件中有效(即class保留), 当运行 Java 程序时, JVM 不会保留注解。 这是默认值。RetentionPolicy.RUNTIME在运行时有效(即运行时保留),当运行 Java 程序时, JVM 会保留注释。程序可以通过反射获取该注释。

@Retention(RetentionPolicy.RUNTIME)public @interface MyAnnotation { String value() default "hello";} @Target
用于指定被修饰的 Annotation 能用于修饰哪些程序元素。 @Target 也包含一个名为 value 的成员变量。
源码中Target里面是一个枚举类型的元素类型数组ElementType[]
public @interface Target { /** * Returns an array of the kinds of elements an annotation type * can be applied to. * @return an array of the kinds of elements an annotation type * can be applied to */ ElementType[] value();} public enum ElementType { /** Class, interface (including annotation type), or enum declaration */ TYPE, /** Field declaration (includes enum constants) */ FIELD, /** Method declaration */ METHOD, /** Formal parameter declaration */ PARAMETER, /** Constructor declaration */ CONSTRUCTOR, /** Local variable declaration */ LOCAL_VARIABLE, /** Annotation type declaration */ ANNOTATION_TYPE, /** Package declaration */ PACKAGE, /** * Type parameter declaration * * @since 1.8 */ TYPE_PARAMETER, /** * Use of a type * * @since 1.8 */ TYPE_USE} 
@Documented
用于指定被该元 Annotation 修饰的 Annotation 类将被javadoc工具提取成文档。默认情况下,javadoc是不包括注解的。定义为Documented的注解必须设置Retention值为RUNTIME。
@Inherited
被它修饰的 Annotation 将具有继承性。如果某个类使用了被@Inherited 修饰的 Annotation, 则其子类将自动具有该注解。
五、利用反射获取注解信息
在 java.lang.reflect 包下新增了 AnnotatedElement 接口, 该接口代表程序中可以接受注解的程序元素。当一个 Annotation 类型被定义为运行时 Annotation 后, 该注解才是运行时可见, 当 class 文件被载入时保存在 class 文件中的 Annotation 才会被虚拟机读取。
程序可以调用 AnnotatedElement对象的如下方法来访问 Annotation 信息
 示例
示例 Person类有自定义的注解@MyAnnotation并且value="hello"
@MyAnnotation(value="hello")class Person{ private String name; private int age; public Person() { } public Person(String name, int age) { this.name = name; this.age = age; } public void walk(){ System.out.println("人走路"); } public void eat(){ System.out.println("人吃饭"); }} 通过反射获取注解
@Test public void testGetAnnotation(){ Class clazz = Person.class; Annotation[] annotations = clazz.getAnnotations(); for (int i = 0; i < annotations.length; i++) { System.out.println(annotations[i]); } } 输出结果:

六、JDK8中注解的新特性
Java 8对注解处理提供了两点改进:可重复的注解及可用于类型的注解。此外,反射也得到了加强,在Java8中能够得到方法参数的名称。这会简化标注在方法参数上的注解。
可重复的注解
定义一个MyAnnotations注解,里面是MyAnnotation的一个数组
public @interface MyAnnotations { MyAnnotation[] value();} 通过@MyAnnotations来重复使用@MyAnnotation
@MyAnnotations({ @MyAnnotation(value="hello"),@MyAnnotation(value="world")})class Person{ private String name; private int age; public Person() { } public Person(String name, int age) { this.name = name; this.age = age; } public void walk(){ System.out.println("人走路"); } public void eat(){ System.out.println("人吃饭"); }} 在JDK8之后可以使用@Repeatable这个注解
@Target({ TYPE, FIELD, METHOD, PARAMETER, CONSTRUCTOR, LOCAL_VARIABLE})@Retention(RetentionPolicy.RUNTIME)public @interface MyAnnotations { MyAnnotation[] value();} 在MyAnnotation上声明@Repeatable,成员值为MyAnnotations.class。MyAnnotation的Target和Retention等元注解与MyAnnotations相同。
@Repeatable(MyAnnotations.class)@Target({ TYPE, FIELD, METHOD, PARAMETER, CONSTRUCTOR, LOCAL_VARIABLE})@Retention(RetentionPolicy.RUNTIME)public @interface MyAnnotation { String value() default "hello";} @MyAnnotation这个注解就可以重复使用了
@MyAnnotation(value="hello")@MyAnnotation(value="world")class Person{ private String name; private int age; public Person() { } public Person(String name, int age) { this.name = name; this.age = age; } public void walk(){ System.out.println("人走路"); } public void eat(){ System.out.println("人吃饭"); }} 可用于类型的注解
ElementType.TYPE_PARAMETER 表示该注解能写在类型变量的声明语句中(如:泛型声明)
@Repeatable(MyAnnotations.class)@Target({ TYPE, FIELD, METHOD, PARAMETER, CONSTRUCTOR, LOCAL_VARIABLE, TYPE_PARAMETER})@Retention(RetentionPolicy.RUNTIME)public @interface MyAnnotation { String value() default "hello";} class Generic<@MyAnnotation T>{ } ElementType.TYPE_USE 表示该注解能写在使用类型的任何语句中。
@Repeatable(MyAnnotations.class)@Target({ TYPE, FIELD, METHOD, PARAMETER, CONSTRUCTOR, LOCAL_VARIABLE, TYPE_PARAMETER, TYPE_USE})@Retention(RetentionPolicy.RUNTIME)public @interface MyAnnotation { String value() default "hello";} class Generic<@MyAnnotation T> { public void show() throws @MyAnnotation RuntimeException{ ArrayList<@MyAnnotation String> arrayList = new ArrayList<>(); int num = (@MyAnnotation int)10L; }} 转载地址:http://dnpi.baihongyu.com/